
Implementing proper ecommerce tracking for your WooCommerce store isn’t just about adding a tracking ID and hoping for the best. Between WooCommerce’s PHP architecture, WordPress plugin conflicts, GA4’s enhanced ecommerce requirements, and GTM’s data layer specifications, you’re navigating a complex technical landscape that requires both development expertise and business analytics knowledge.
This guide covers the complete technical implementation of a GA4-compliant data layer for WooCommerce using Google Tag Manager, including product impressions, add-to-cart events, checkout tracking, purchase confirmation, and revenue attribution. If you’re running a WordPress ecommerce store and need accurate conversion data, attribution modeling, and ROI measurement, this is your implementation blueprint.

Table of Contents
Why Proper Ecommerce Tracking Matters (The Business Case)
Before diving into code, understand what you’re actually building and why it’s critical to your business.
The Revenue Impact of Accurate Tracking
Without proper ecommerce tracking:
- You don’t know which marketing channels drive revenue (only sessions)
- Can’t calculate true ROAS (Return on Ad Spend)
- Attribution models are worthless (no conversion data to attribute)
- Product performance is invisible (can’t identify top sellers vs. dead weight)
- Cart abandonment insights are missing
- Customer Lifetime Value (CLV) calculations are impossible
With complete ecommerce tracking:
- See exactly which Google Ads campaigns generate $X in revenue
- Understand product-level performance (bestsellers, margin drivers, underperformers)
- Identify checkout friction points causing abandonment
- Build customer segments by purchase behavior
- Implement dynamic remarketing with product catalogs
- Calculate accurate Customer Acquisition Cost (CAC)
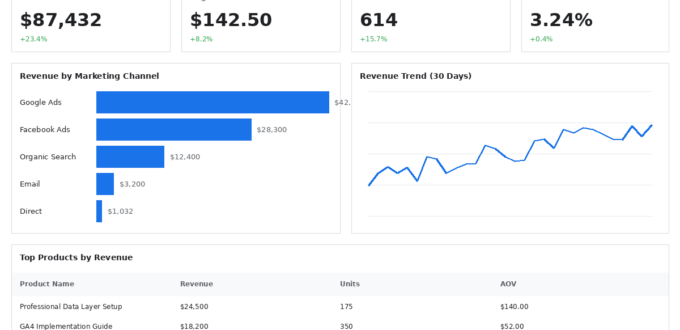
The Business Metrics You’ll Unlock
A properly implemented data layer enables tracking of:
Revenue Metrics:
- Total revenue by channel, campaign, product
- Average Order Value (AOV)
- Revenue per Session
- Product Revenue Contribution
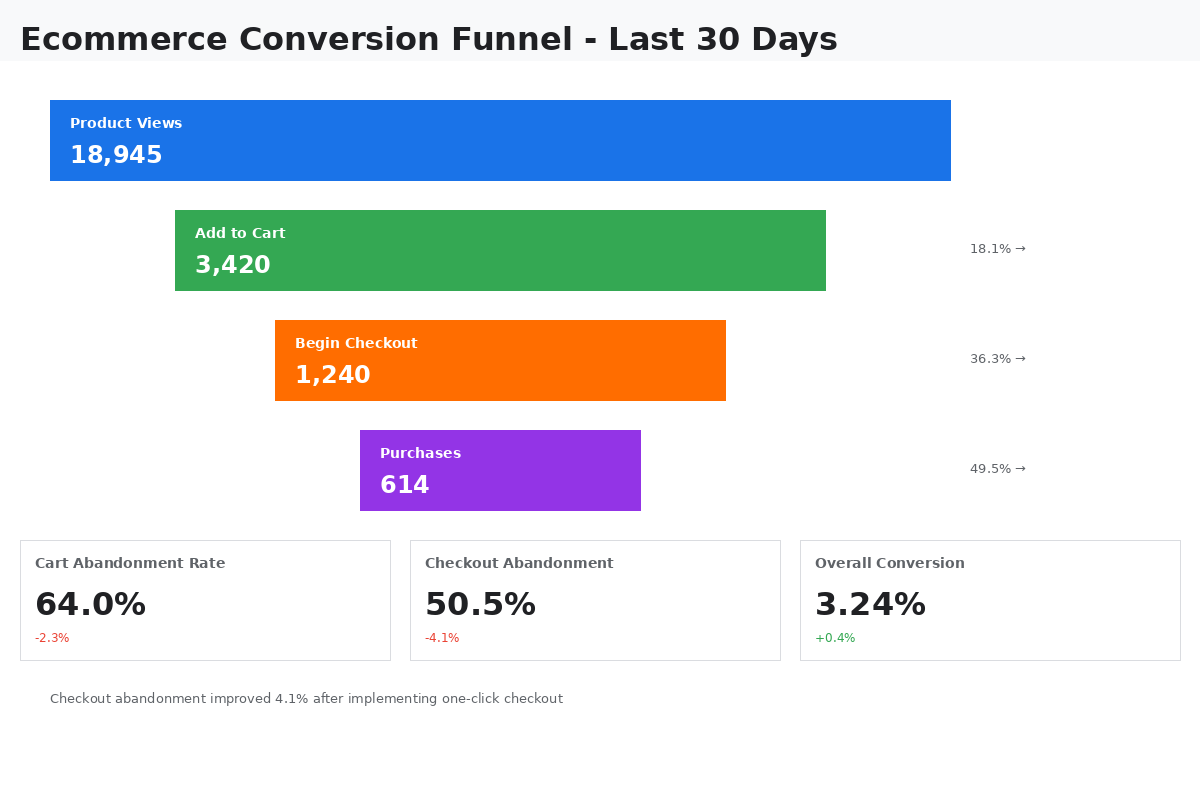
Conversion Metrics:
- Ecommerce Conversion Rate
- Cart Abandonment Rate
- Checkout Abandonment by Step
- Product Add-to-Cart Rate
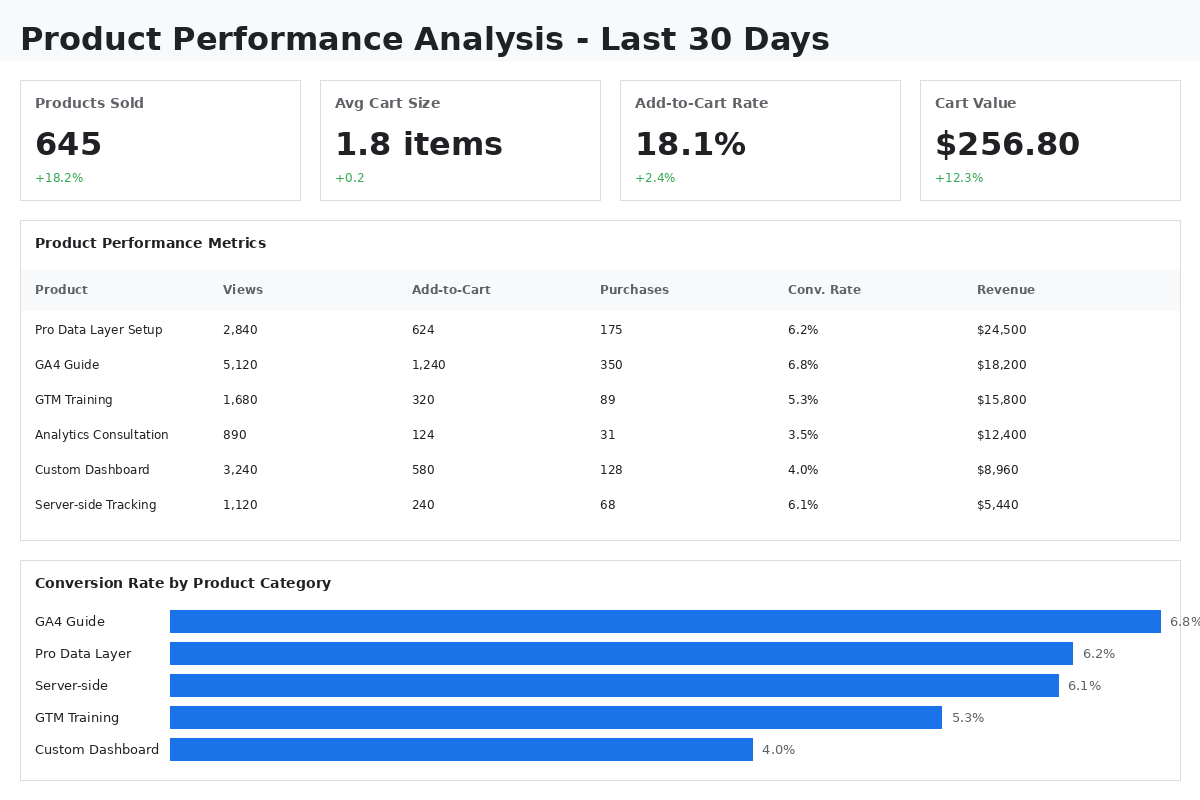
Product Performance:
- Product Views
- Product Detail Views
- Add-to-Cart Rate by Product
- Purchase Rate by Product
- Product Revenue & Quantity
Customer Behavior:
- Days to Purchase
- Touchpoints to Conversion
- Product Affinity (what’s bought together)
- Customer Lifetime Value
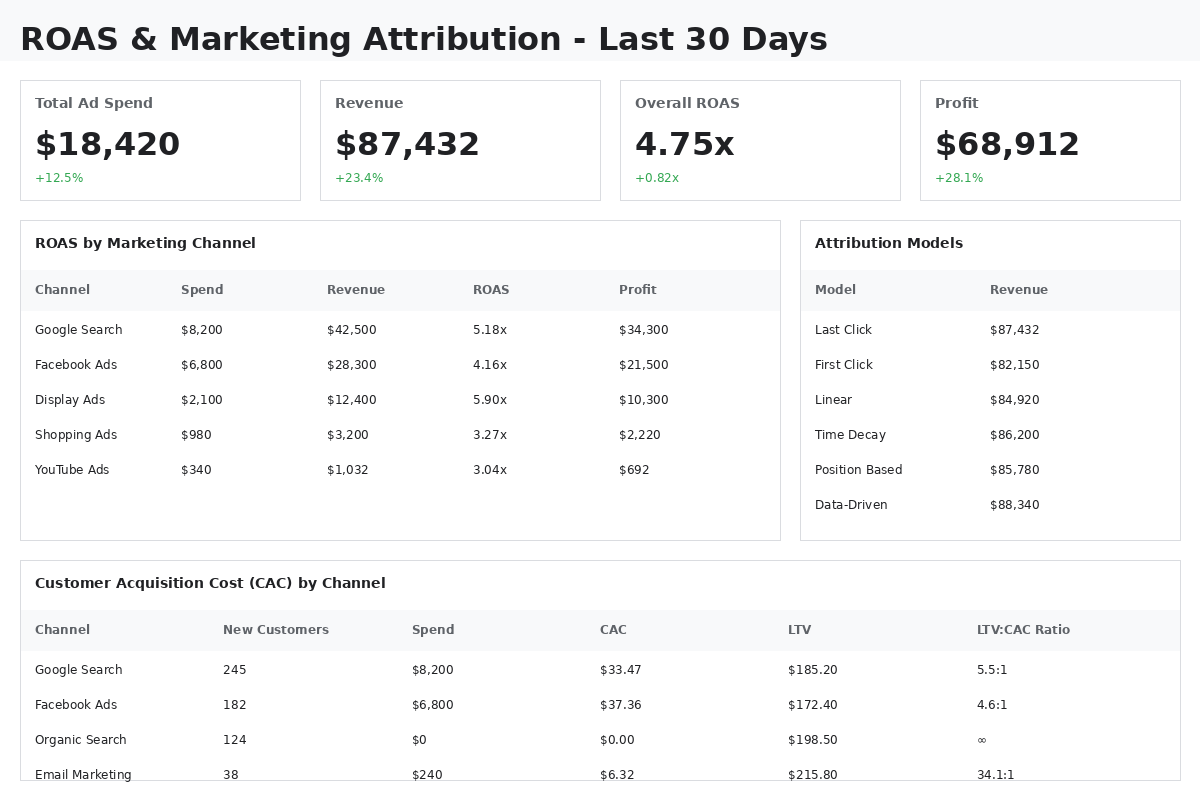
Marketing Attribution:
- First-Click Revenue Attribution
- Last-Click Revenue Attribution
- Multi-Touch Attribution Models
- Assisted Conversions by Channel
Without proper tracking, you’re making $100,000+ business decisions based on guesswork instead of data.
Understanding the WooCommerce-GA4-GTM Architecture
The Three-Layer Stack
User Browses Store
       ↓
WooCommerce (PHP) generates page with products
       ↓
Data Layer (JavaScript object) populated with ecommerce data
       ↓
GTM reads Data Layer
       ↓
GTM fires GA4 Ecommerce Events
       ↓
GA4 receives structured ecommerce data
       ↓
Revenue appears in GA4 reports
Why This Is Complex
Challenge 1: WooCommerce is PHP, Data Layer is JavaScript
WooCommerce renders everything server-side in PHP. The data layer lives client-side in JavaScript. You need to:
- Extract product data from WooCommerce PHP objects
- Convert to JavaScript format
- Ensure data is available when GTM fires
- Handle AJAX cart updates
- Deal with theme conflicts
Challenge 2: GA4 Enhanced Ecommerce Specification
GA4 requires specific event names and parameter structures:
- Event:
view_item_list(notproductImpressionlike Universal Analytics) - Event:
view_item(product detail view) - Event:
add_to_cart(with items array) - Event:
begin_checkout - Event:
purchase(with transaction data)
Each event needs exact parameter names (item_id, item_name, price, quantity, etc.)
Challenge 3: WordPress Plugin Ecosystem
Your WooCommerce store has:
- Caching plugins (may cache data layer incorrectly)
- Page builder plugins (Elementor, Divi) that modify HTML structure
- Checkout plugins (multi-step, one-page) that change flow
- Payment gateway plugins that redirect
- Theme that may already include partial tracking (conflicts!)
Challenge 4: Business Logic Translation
You need to decide:
- What constitutes a “product view” (list view, quick view, detail page?)
- How to handle product variants (separate items or single item with variant?)
- When to fire checkout events (each step vs. begin only?)
- How to attribute bundle products
- How to handle subscription products vs. one-time purchases
- Tax/shipping inclusion in revenue
Prerequisites: What You Need Before Starting
Technical Requirements
- WordPress 5.0+ with WooCommerce 5.0+
- Google Tag Manager container installed on site
- GA4 property created
- Admin access to WordPress
- Ability to add/edit PHP code (child theme or Code Snippets plugin)
- Understanding of JavaScript and PHP basics
Business Requirements
- Defined KPIs (what metrics matter for your business?)
- Product categorization strategy (how products are grouped)
- Revenue attribution model decided (first-click, last-click, data-driven?)
- Tax/shipping handling policy (included in revenue or separate?)
- Currency specification (single currency or multi-currency?)
Testing Environment
CRITICAL: Never implement directly on production. You need:
- Staging site for testing
- Test orders capability (use test payment gateway)
- GTM Preview Mode access
- GA4 DebugView access
Step 1: Implement Base Data Layer Structure
The foundation is a globally accessible dataLayer array that GTM can read.
Initialize Data Layer (Before GTM)
In your WordPress theme’s header.php, before the GTM container snippet:
<!-- Data Layer Initialization -->
<script>
window.dataLayer = window.dataLayer || [];
</script>
CRITICAL: This must come before your GTM container code. If GTM loads first, events may be lost.
Step 2: Product List Impressions (Category Pages, Shop Page)
When users browse product categories or your shop page, track which products they see.
GA4 Event: view_item_list
This event fires when users see a list of products (category pages, search results, shop homepage).
WooCommerce Implementation
Add this to your theme’s functions.php or a custom plugin:
<?php
/**
 * WooCommerce Data Layer - Product List Impressions
 */

add_action('woocommerce_after_shop_loop', 'geek_kb_product_list_datalayer', 5);

function geek_kb_product_list_datalayer() {
    global $wp_query;

    if (!isset($wp_query->posts)) return;

    $items = array();
    $list_name = 'Shop Page';

    // Determine list name based on context
    if (is_product_category()) {
        $category = get_queried_object();
        $list_name = 'Category: ' . $category->name;
    } elseif (is_product_tag()) {
        $tag = get_queried_object();
        $list_name = 'Tag: ' . $tag->name;
    } elseif (is_search()) {
        $list_name = 'Search Results';
    }

    $position = 1;

    foreach ($wp_query->posts as $post) {
        $product = wc_get_product($post->ID);

        if (!$product) continue;

        // Get product categories
        $categories = wp_get_post_terms($product->get_id(), 'product_cat');
        $category_name = !empty($categories) ? $categories[0]->name : '';

        $items[] = array(
            'item_id' => $product->get_sku() ? $product->get_sku() : $product->get_id(),
            'item_name' => $product->get_name(),
            'item_brand' => '', // Add your brand logic here
            'item_category' => $category_name,
            'item_variant' => '', // For variable products
            'price' => (float) $product->get_price(),
            'quantity' => 1,
            'index' => $position,
            'item_list_name' => $list_name,
            'item_list_id' => is_product_category() ? get_queried_object()->term_id : ''
        );

        $position++;
    }

    if (empty($items)) return;

    ?>
    <script>
    window.dataLayer = window.dataLayer || [];
    dataLayer.push({ ecommerce: null }); // Clear previous ecommerce object
    dataLayer.push({
        'event': 'view_item_list',
        'ecommerce': {
            'item_list_name': '<?php echo esc_js($list_name); ?>',
            'items': <?php echo json_encode($items); ?>
        }
    });
    </script>
    <?php
}
?>
What This Code Does:
- Detects Context: Determines if user is on shop page, category, tag, or search
- Loops Through Products: Gets all products displayed on current page
- Extracts Product Data: SKU, name, price, category
- Builds Items Array: GA4-compliant structure
- Pushes to Data Layer:
view_item_listevent with all products
Step 3: Product Detail View
When a user clicks on a product and views the product detail page.
GA4 Event: view_item
<?php
/**
 * WooCommerce Data Layer - Product Detail View
 */

add_action('woocommerce_after_single_product', 'geek_kb_product_detail_datalayer');

function geek_kb_product_detail_datalayer() {
    global $product;

    if (!is_object($product)) {
        $product = wc_get_product(get_the_ID());
    }

    if (!$product) return;

    // Get product categories
    $categories = wp_get_post_terms($product->get_id(), 'product_cat');
    $category_name = !empty($categories) ? $categories[0]->name : '';
    $category_hierarchy = array();

    if (!empty($categories)) {
        $category_hierarchy[] = $categories[0]->name;
        if (isset($categories[1])) $category_hierarchy[] = $categories[1]->name;
        if (isset($categories[2])) $category_hierarchy[] = $categories[2]->name;
    }

    $item = array(
        'item_id' => $product->get_sku() ? $product->get_sku() : $product->get_id(),
        'item_name' => $product->get_name(),
        'item_brand' => '', // Add brand
        'item_category' => isset($category_hierarchy[0]) ? $category_hierarchy[0] : '',
        'item_category2' => isset($category_hierarchy[1]) ? $category_hierarchy[1] : '',
        'item_category3' => isset($category_hierarchy[2]) ? $category_hierarchy[2] : '',
        'item_variant' => '', // For variable products
        'price' => (float) $product->get_price(),
        'quantity' => 1
    );

    ?>
    <script>
    window.dataLayer = window.dataLayer || [];
    dataLayer.push({ ecommerce: null });
    dataLayer.push({
        'event': 'view_item',
        'ecommerce': {
            'currency': '<?php echo get_woocommerce_currency(); ?>',
            'value': <?php echo (float) $product->get_price(); ?>,
            'items': [<?php echo json_encode($item); ?>]
        }
    });
    </script>
    <?php
}
?>
Step 4: Add to Cart Event
This is where it gets tricky. WooCommerce uses AJAX for add-to-cart on product archives, but a form submission on single product pages.
GA4 Event: add_to_cart
We need to handle both scenarios:
Scenario A: AJAX Add to Cart (Product Lists)
<?php
/**
 * WooCommerce Data Layer - AJAX Add to Cart
 */

add_filter('woocommerce_loop_add_to_cart_link', 'geek_kb_add_to_cart_data_attribute', 10, 3);

function geek_kb_add_to_cart_data_attribute($html, $product, $args) {

    $categories = wp_get_post_terms($product->get_id(), 'product_cat');
    $category_name = !empty($categories) ? $categories[0]->name : '';

    $product_data = array(
        'item_id' => $product->get_sku() ? $product->get_sku() : $product->get_id(),
        'item_name' => $product->get_name(),
        'item_category' => $category_name,
        'price' => (float) $product->get_price(),
        'quantity' => 1
    );

    $data_attr = 'data-product-data="' . htmlspecialchars(json_encode($product_data), ENT_QUOTES, 'UTF-8') . '"';

    $html = str_replace('<a ', '<a ' . $data_attr . ' ', $html);

    return $html;
}
?>
JavaScript to capture AJAX add to cart:
<script>
jQuery(document).ready(function($) {
    $(document.body).on('added_to_cart', function(event, fragments, cart_hash, button) {

        var productData = button.attr('data-product-data');

        if (!productData) return;

        try {
            var item = JSON.parse(productData);

            window.dataLayer = window.dataLayer || [];
            dataLayer.push({ ecommerce: null });
            dataLayer.push({
                'event': 'add_to_cart',
                'ecommerce': {
                    'currency': '<?php echo get_woocommerce_currency(); ?>',
                    'value': item.price * item.quantity,
                    'items': [item]
                }
            });

        } catch(e) {
            console.error('Add to cart tracking error:', e);
        }
    });
});
</script>
Scenario B: Single Product Page Add to Cart
<?php
/**
 * WooCommerce Data Layer - Single Product Add to Cart
 */

add_action('woocommerce_add_to_cart', 'geek_kb_single_add_to_cart_datalayer', 10, 6);

function geek_kb_single_add_to_cart_datalayer($cart_item_key, $product_id, $quantity, $variation_id, $variation, $cart_item_data) {

    $product = wc_get_product($variation_id ? $variation_id : $product_id);

    if (!$product) return;

    $categories = wp_get_post_terms($product->get_id(), 'product_cat');
    $category_name = !empty($categories) ? $categories[0]->name : '';

    $item = array(
        'item_id' => $product->get_sku() ? $product->get_sku() : $product->get_id(),
        'item_name' => $product->get_name(),
        'item_category' => $category_name,
        'price' => (float) $product->get_price(),
        'quantity' => $quantity
    );

    // Store in session for next page load
    WC()->session->set('geek_kb_add_to_cart_event', array(
        'currency' => get_woocommerce_currency(),
        'value' => (float) $product->get_price() * $quantity,
        'items' => array($item)
    ));
}

// Fire event on next page load
add_action('wp_footer', 'geek_kb_fire_add_to_cart_event');

function geek_kb_fire_add_to_cart_event() {
    $event_data = WC()->session->get('geek_kb_add_to_cart_event');

    if (!$event_data) return;

    ?>
    <script>
    window.dataLayer = window.dataLayer || [];
    dataLayer.push({ ecommerce: null });
    dataLayer.push({
        'event': 'add_to_cart',
        'ecommerce': <?php echo json_encode($event_data); ?>
    });
    </script>
    <?php

    WC()->session->set('geek_kb_add_to_cart_event', null);
}
?>
Step 5: Begin Checkout Event
Track when users land on the checkout page.
GA4 Event: begin_checkout
<?php
/**
 * WooCommerce Data Layer - Begin Checkout
 */

add_action('woocommerce_before_checkout_form', 'geek_kb_begin_checkout_datalayer', 5);

function geek_kb_begin_checkout_datalayer() {

    $cart = WC()->cart;

    if ($cart->is_empty()) return;

    $items = array();
    $cart_total = 0;

    foreach ($cart->get_cart() as $cart_item_key => $cart_item) {
        $product = $cart_item['data'];

        $categories = wp_get_post_terms($product->get_id(), 'product_cat');
        $category_name = !empty($categories) ? $categories[0]->name : '';

        $item = array(
            'item_id' => $product->get_sku() ? $product->get_sku() : $product->get_id(),
            'item_name' => $product->get_name(),
            'item_category' => $category_name,
            'price' => (float) $product->get_price(),
            'quantity' => $cart_item['quantity']
        );

        $items[] = $item;
        $cart_total += (float) $product->get_price() * $cart_item['quantity'];
    }

    ?>
    <script>
    window.dataLayer = window.dataLayer || [];
    dataLayer.push({ ecommerce: null });
    dataLayer.push({
        'event': 'begin_checkout',
        'ecommerce': {
            'currency': '<?php echo get_woocommerce_currency(); ?>',
            'value': <?php echo $cart_total; ?>,
            'items': <?php echo json_encode($items); ?>
        }
    });
    </script>
    <?php
}
?>
Step 6: Purchase Event (The Most Critical One)
This is the revenue event. If this fails, you have no ecommerce data in GA4.
GA4 Event: purchase
<?php
/**
 * WooCommerce Data Layer - Purchase Event
 */

add_action('woocommerce_thankyou', 'geek_kb_purchase_datalayer');

function geek_kb_purchase_datalayer($order_id) {

    if (!$order_id) return;

    // Prevent duplicate tracking
    if (get_post_meta($order_id, '_geek_kb_tracked', true)) return;

    $order = wc_get_order($order_id);

    if (!$order) return;

    $items = array();

    foreach ($order->get_items() as $item_id => $item) {
        $product = $item->get_product();

        if (!$product) continue;

        $categories = wp_get_post_terms($product->get_id(), 'product_cat');
        $category_name = !empty($categories) ? $categories[0]->name : '';

        $item_data = array(
            'item_id' => $product->get_sku() ? $product->get_sku() : $product->get_id(),
            'item_name' => $item->get_name(),
            'item_category' => $category_name,
            'price' => (float) $order->get_item_subtotal($item, false, false),
            'quantity' => $item->get_quantity()
        );

        $items[] = $item_data;
    }

    ?>
    <script>
    window.dataLayer = window.dataLayer || [];
    dataLayer.push({ ecommerce: null });
    dataLayer.push({
        'event': 'purchase',
        'ecommerce': {
            'transaction_id': '<?php echo $order->get_order_number(); ?>',
            'affiliation': '<?php echo get_bloginfo('name'); ?>',
            'value': <?php echo $order->get_total(); ?>,
            'tax': <?php echo $order->get_total_tax(); ?>,
            'shipping': <?php echo $order->get_shipping_total(); ?>,
            'currency': '<?php echo $order->get_currency(); ?>',
            'coupon': '<?php echo implode(', ', $order->get_coupon_codes()); ?>',
            'items': <?php echo json_encode($items); ?>
        }
    });
    </script>
    <?php

    // Mark order as tracked
    update_post_meta($order_id, '_geek_kb_tracked', true);
}
?>
CRITICAL: The transaction_id must be unique. We use $order->get_order_number() which WooCommerce guarantees is unique.
CRITICAL: We prevent duplicate tracking by storing _geek_kb_tracked meta. If a user refreshes the thank-you page, we won’t double-count revenue.
Step 7: GTM Configuration
Now that the data layer is populating, configure GTM to send events to GA4.
Create GA4 Configuration Tag
- GTM → Tags → New
- Tag Type: Google Analytics: GA4 Configuration
- Measurement ID: Your GA4 Measurement ID (G-XXXXXXXXXX)
- Trigger: All Pages
- Save
Create GA4 Ecommerce Event Tags
For each ecommerce event, create a tag:
Example: view_item_list Tag
- Tags → New
- Name:
GA4 - Ecommerce - View Item List - Tag Type: Google Analytics: GA4 Event
- Configuration Tag: Select your GA4 Configuration tag
- Event Name:
view_item_list - Event Parameters: Parameter Name:
ecommerce, Value:{{DLV - ecommerce}}(create this variable)
Create Data Layer Variable for ecommerce
- Variables → User-Defined Variables → New
- Variable Type: Data Layer Variable
- Data Layer Variable Name:
ecommerce - Variable Name:
DLV - ecommerce - Save
Create Custom Event Trigger
- Triggers → New
- Name:
Event - view_item_list - Trigger Type: Custom Event
- Event name:
view_item_list - Save
Apply Trigger to Tag
Back in your GA4 - Ecommerce - View Item List tag:
- Triggering: Select
Event - view_item_list - Save
Repeat for All Ecommerce Events
Create similar tags for:
view_itemadd_to_cartbegin_checkoutpurchase
Step 8: Testing & Validation
GTM Preview Mode
- GTM → Preview
- Enter your WooCommerce site URL
- Test each flow:
Product List View:
- Visit shop page or category
- Check GTM Debug:
view_item_listevent fires - Check
ecommerceobject has items array
Product Detail:
- Click a product
- Check GTM Debug:
view_itemevent fires
Add to Cart:
- Click “Add to Cart”
- Check GTM Debug:
add_to_cartevent fires - Verify quantity is correct
Checkout:
- Go to checkout page
- Check GTM Debug:
begin_checkoutfires
Purchase (CRITICAL):
- Complete a test order (use test payment gateway)
- Check thank-you page
- Check GTM Debug:
purchaseevent fires - Verify:
transaction_idis unique,valuematches order total,itemsarray populated - Refresh page – event should NOT fire again
GA4 DebugView
- GA4 → Admin → DebugView
- Perform test purchase
- Verify in DebugView: All events appear, Event parameters correct, Revenue attributed correctly
Real-Time Reports
- GA4 → Reports → Realtime
- Make test purchase
- Verify: Event count increments, Revenue appears (may take 1-2 minutes)
Ecommerce Purchases Report (24-48 hours)
After 24-48 hours, check:
- GA4 → Reports → Monetization → Ecommerce purchases
- Your test order should appear
- Revenue should match
Common Implementation Mistakes (And How to Avoid Them)
Mistake 1: Data Layer Loads After GTM
Symptom: Events don’t fire in GTM Preview Mode
Cause: GTM container loads before data layer is initialized
Fix: Ensure window.dataLayer = []; appears before GTM snippet in <head>
Mistake 2: Duplicate Purchase Tracking
Symptom: Revenue is 2x-3x actual revenue in GA4
Cause: Users refresh thank-you page, or payment redirects trigger multiple fires
Fix: Use get_post_meta / update_post_meta to track if order already sent
Mistake 3: Wrong Currency or Value
Symptom: Revenue in GA4 doesn’t match WooCommerce orders
Cause: Sending price including tax when GA4 expects excluding tax, or sending product price instead of order total, or wrong currency code
Fix: Use $order->get_total() for purchase value (not item prices), use get_woocommerce_currency() consistently, decide tax inclusion policy and stick to it
Mistake 4: Missing Items Array
Symptom: Events fire but no product-level data in GA4
Cause: items array empty or malformed
Fix: Verify items is an array, not object; each item must have item_id and item_name minimum; check JSON encoding in PHP
Mistake 5: Caching Breaks Dynamic Data
Symptom: Cart shows wrong products, or events fire with old data
Cause: Caching plugin caches data layer output
Fix: Exclude data layer scripts from caching, use JavaScript to fetch cart data dynamically, disable page caching on checkout/cart pages
Advanced Considerations
Handling Variable Products
For products with variations (size, color), you need to:
if ($product->is_type('variable')) {
    $variation_id = $cart_item['variation_id'];
    $variation = wc_get_product($variation_id);

    $item_variant = array();
    foreach ($cart_item['variation'] as $key => $value) {
        $item_variant[] = $value;
    }

    $item['item_variant'] = implode(' / ', $item_variant);
}
Multi-Currency Stores
If using WPML or similar:
$currency = get_woocommerce_currency(); // Gets active currencyEnsure all prices are in the same currency per transaction.
Subscription Products
WooCommerce Subscriptions need special handling:
if ($product->is_type('subscription')) {
    // Track subscription value differently
    // Consider using recurring total vs. initial payment
}
Refunds and Returns
Track refunds separately:
add_action('woocommerce_order_refunded', 'geek_kb_refund_datalayer', 10, 2);

function geek_kb_refund_datalayer($order_id, $refund_id) {
    // Push 'refund' event to data layer
    // Negative transaction value
}
The Business Intelligence Layer: Beyond Implementation
Implementing the data layer is only 50% of the work. The other 50% is understanding what the data means for your business.
Questions You Need to Answer First
Product Strategy: Which products are “hero” products (high margin, high volume)? Which are “gateway” products (low price, drive discovery)? Which should be discontinued (low margin, low volume)?
Pricing Strategy: What’s the optimal price point per product category? How does AOV vary by traffic source? What discount depth drives conversions without killing margin?
Marketing Attribution: Which channels drive high-value customers vs. one-time buyers? What’s the typical customer journey (touchpoints before purchase)? Which campaigns drive assisted conversions vs. last-click?
Customer Segmentation: New customers vs. returning customers (behavior differences?) High-value customers (top 10% by CLV) – what’s their acquisition source? Cart abandoners – what’s their common characteristic?
The Data You’ll Need Beyond Ecommerce Events
- Customer Lifetime Value (CLV): Requires user_id tracking + repeat purchase data
- Product Margins: Requires cost data (not just revenue)
- Inventory Levels: To correlate stock-outs with traffic surges
- Fulfillment Costs: For true profit calculation
This is where business expertise meets technical implementation. You can have perfect tracking, but if you don’t know how to interpret the data, you’re just collecting numbers.
When to Get Professional Help
Signs You Need an Expert
You should consider professional implementation if:
- Your store has 100+ products with complex variants
- You use multiple payment gateways with different redirect flows
- You have subscription products alongside one-time purchases
- You operate in multiple currencies or countries
- You need custom checkout flows (multi-step, one-page, etc.)
- You have plugin conflicts breaking tracking
- You need server-side tracking (GTM Server-Side)
- You require data warehousing integration (BigQuery, Snowflake)
- You need help interpreting the data for business decisions
- You lack development resources in-house
What Professional Implementation Includes
A proper ecommerce tracking implementation service provides:
Technical Implementation: Complete data layer architecture, all GA4 ecommerce events configured, GTM container setup and testing, cross-browser and cross-device testing, duplicate transaction prevention, cache compatibility fixes
Business Intelligence: KPI definition workshop (what to measure), custom reporting dashboard setup, attribution model configuration, customer segment definition, product performance analysis framework
Ongoing Optimization: Monthly data quality audits, event tracking validation, conversion funnel optimization, A/B test measurement setup, ROI reporting
Documentation: Complete technical documentation, training for your team, data dictionary (what each metric means), troubleshooting guide
Conclusion
Implementing a proper WooCommerce data layer for GA4 requires navigating WooCommerce’s PHP architecture, WordPress plugin complexities, GA4’s enhanced ecommerce specification, and GTM’s data layer requirements. While this guide provides the technical foundation, successful ecommerce analytics also requires business intelligence expertise to translate data into actionable insights.
The code snippets in this guide provide a production-ready starting point, but every WooCommerce store has unique requirements: custom checkout flows, product variants, multi-currency, subscriptions, and business logic that requires tailored implementation.
If you’re generating over $50,000/month in ecommerce revenue, the cost of incorrect tracking (missed attribution, wrong product performance data, inaccurate ROI) far exceeds the investment in professional implementation.
Need Expert Implementation?
We specialize in WooCommerce GA4 data layer implementation for growing ecommerce businesses. Our service includes:
- Complete Technical Implementation – Data layer, GTM, GA4 ecommerce events, tested and validated
- Business Intelligence Consultation – Define KPIs, attribution models, and reporting structure
- Custom Development – Handle your unique checkout, products, and payment flows
- Quality Assurance – Comprehensive testing across all user journeys
- Documentation & Training – Complete handoff with training for your team
- Ongoing Support – Monthly audits and optimization
Related Resources
- GA4 Attribution Models Complete Guide – Understand how to attribute WooCommerce revenue across channels
- GA4 Source Tracking Explained – Master traffic source attribution for ecommerce
- Google Ads Audience Exclusions – Use ecommerce data to optimize ad targeting